Fetch API
Fetch API는 HTTP 요청과 응답 등을 Javascript에서 접근하고 조작할 수 있는 인터페이스를 제공합니다.
XMLHttpRequest 모듈과 비교해서 Fetch는 Promise 기반으로 구성되어 있어 더 간편하게 사용할 수 있습니다.
기본 구조
1
2
3
fetch(url, options)
  .then((response) => console.log("response:", response))
  .catch((error) => console.log("error:", error));
- fetch()는 첫 번째 인자로 url, 두 번째 인자로 option 객체를 받고, Promise 객체를 반환합니다.
- .then()에서 응답 객체를 받고, .catch()에서 에러를 받습니다.
1
2
3
4
5
6
7
8
9
  fetch(url, {
    method: 'post',
    headers: {
      "Content-type": "application/x-www-form-urlencoded; charset=UTF-8"
    },
    body: 'foo=bar&lorem=ipsum'
  })
  .then((response) => console.log(response);)
  .catch((error) => console.log(error));
- 두 번째 인자인 options 객체에 추가적인 데이터를 객체 변수에 저장해서 전달합니다.
Property
- method : HTTP 요청 방식 (GET, POST, PUT, DELETE 등)
- headers : 요청 헤더 정보
body : JSON 형태로 주고 받을 데이터
통신을 할 때는 String 형태의 JSON으로 보내야 하기 때문에 JSON.stringify()를 활용해서 JSON String으로 변환합니다.
- 그 외 : mode, cache 등
참고 글 : MDN사이트 - Fetch
fetch로 데이터 읽기
1
2
3
fetch(url, options)
  .then((response) => response.json())
  .then((data) => console.log(data));
- 위 코드는 JSON 파일을 가져와
console.log로 출력합니다. - fetch 함수는 Promise 객체를 반환합니다.
- 코드를 보면, then() 메서드를 체이닝하고 있습니다.
- 비동기로 처리된 fetch 함수의 결과 값이 들어오면 then 메서드를 실행합니다.
- 첫 번째
then()에서는 서버에서 보내준 응답의 본문을 추출합니다. - 두 번째
then()에서는 추출된 본문으로 작업합니다. (위의 예제에서는console.log)
첫 번째 then() 메서드
then() 메서드는 fetch()로 반환된 Promise 객체의 PromiseResult 값인 Response 객체를 보여줍니다.
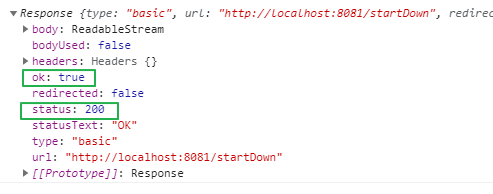
Response 객체
response 객체는 HTTP 응답 전체를 나타내는 객체입니다.
![Response-Object]()
Property
- response.body : ReadableStream의 내용
- response.headers : 응답 Headers와 관련된 객체
- response.ok : 응답의 HTTP 상태 코드가 200~299일 때 true (즉, 성공했는 지 여부를 나타내는 boolean)
- response.status : 응답의 HTTP 상태 코드
본문 추출 메서드
- response.json() : 응답을 JSON 형태로 파싱
- response.text() : 응답을 텍스트로 반환
- 그 외 : response.blob(), response.arrayBuffer() 등
참고 글 : mdn사이트 - response 객체
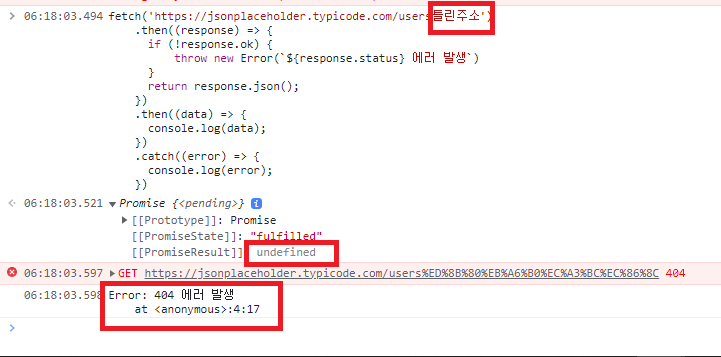
예외 처리
fetch()로 부터 반환된 Promise 객체는 상태 코드가 404, 500 등의 에러 코드여도 reject가 반환되지 않습니다.
즉, catch에서 error를 잡을 수 없습니다.
대신 reponse.ok가 false인 resolve가 반환됩니다.
네트워크 장애나 요청이 완료되지 못한 경우에는 reject가 반환됩니다.
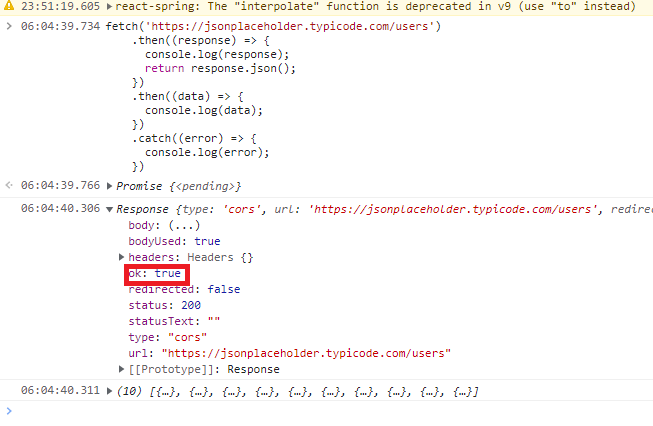
간단 예제
요청 성공 (200)
![Response-ok-true]()
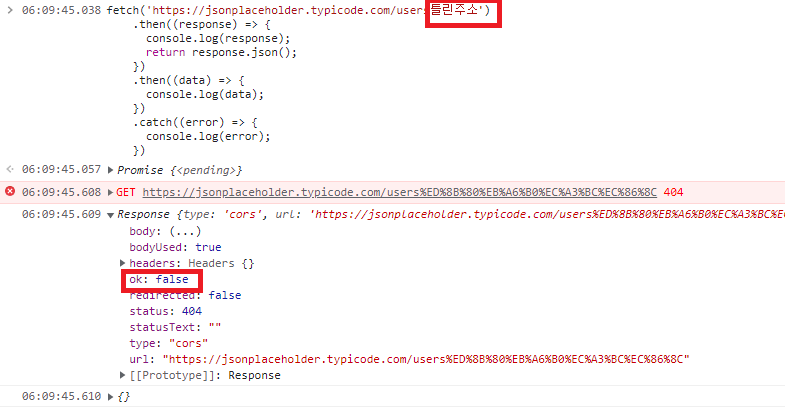
요청 실패 (404)
![Response-ok-false]()
response.ok는 요청이 정상적으로 성공하면 true이므로, 이를 이용해 예외 처리를 합니다.
![fetch-error]()
두 번째 then() 메서드
첫 번째 then() 메서드에서 본문 추출 메서드로 반환된 Promise 객체에 다시 then() 메서드를 체이닝해 PromiseResult 값에 담긴 데이터를 사용합니다.
간단 예제
다음은 가상 데이터 api 사이트를 이용한 예제입니다.
1
2
3
4
5
6
7
8
9
10
11
12
13
14
15
16
17
18
19
20
21
22
23
24
25
26
27
28
29
30
31
32
33
34
35
36
37
38
39
40
41
42
43
44
45
  <!DOCTYPE html>
  <html lang="en">
    <head>
      <meta charset="UTF-8" />
      <meta http-equiv="X-UA-Compatible" content="IE=edge" />
      <meta name="viewport" content="width=device-width, initial-scale=1.0" />
      <title>Document</title>
    </head>
    <body>
      <button onclick="getUser()">버튼</button>
      <h1>Authors</h1>
      <ul id="authors"></ul>

      <div id="userInfo"></div>
      <script>
        function getUser() {
          const ul = document.getElementById("authors");
          const url = "https://jsonplaceholder.typicode.com/users";
          fetch(url)
            .then((res) => {
              return res.json();  // 첫 번쨰 then() 에서 본문 추출
            })
            .then((data) => {  // 두 번쨰 then() 부분에서 데이터 처리
              let authors = data;

              authors.map((author) => {
                let li = document.createElement("li");
                let name = document.createElement("h2");
                let email = document.createElement("span");

                name.innerHTML = `${author.name}`;
                email.innerHTML = `${author.email}`;

                li.appendChild(name);
                li.appendChild(email);
                ul.appendChild(li);
              });
            })
            .catch((err) => {
              console.log(err);
            });
        }
      </script>
    </body>
  </html>
두 번째 then() 메서드에 data를 인자로 갖는 함수를 이용해 버튼을 누르면 응답 받은 데이터를 리스트로 보여주는 페이지입니다.
![fetch-ex1]()
![fetch-ex2]()
예외 처리
두 번째 then() 에서의 예외 처리는 데이터를 이용한 작업 과정에서 발생하는 예외를 처리합니다.- 간단 예제
POST 방식으로 회원가입 할 때 아이디가 이미 존재하는 경우 알림으로 알려주기
(서버의 API는 구현된 상태라고 가정하겠습니다.)
1
2
3
4
5
6
7
8
9
10
11
12
13
14
15
fetch("API 주소", {
  method: "POST",
  body: JSON.stringify({
    id: id,
    password: pw,
  }),
})
  .then((response) => response.json())
  .then((data) => {
    if (data.message === "EXISTS") {
      alert("이미 있는 계정입니다.");
    } else {
      navigate("/main");
    }
  });
위 코드는 사용자가 입력한 id, password를 담아 POST 방식으로 서버에 보냅니다.
받은 응답의 data.message에 따라 두 번째 then()에서 예외를 처리합니다.
- 간단 예제